Showing posts with label how-to. Show all posts

Thursday, September 15, 2016

Liquor Lights - Easy Outdoor Solar Lights

I love to reuse and recycle lots of things, and I always find a use for glass jars. After throwing a few parties in the last year, I had I gorgeous tequila and other liquor bottles that I saved. Just waiting to find an idea on how to reuse them...

Then as I was replacing/repairing my outdoor solar lights, it occurred to me that I could stick the  plastic solar tops on my pretty jars and bottles.


All sorts of glass bottles will work for this project. At first, I wanted to do only the "fancy" bottles. Then I came to really like just the 2 liter Vodka bottles with a handle.  I like all the different heights and sizes too.

Step 1:
Have a nice collection of bottles ready. Remove labels (I soak in soapy water and then use a knife to scrape the last bits).

Step 2:
Unpackage your solar lights. Take the top off the lights, where the light bulb is. Remove any protective covering over the solar panel, and make sure it is turned on. Put it in the sunlight, solar panel up, while you work.


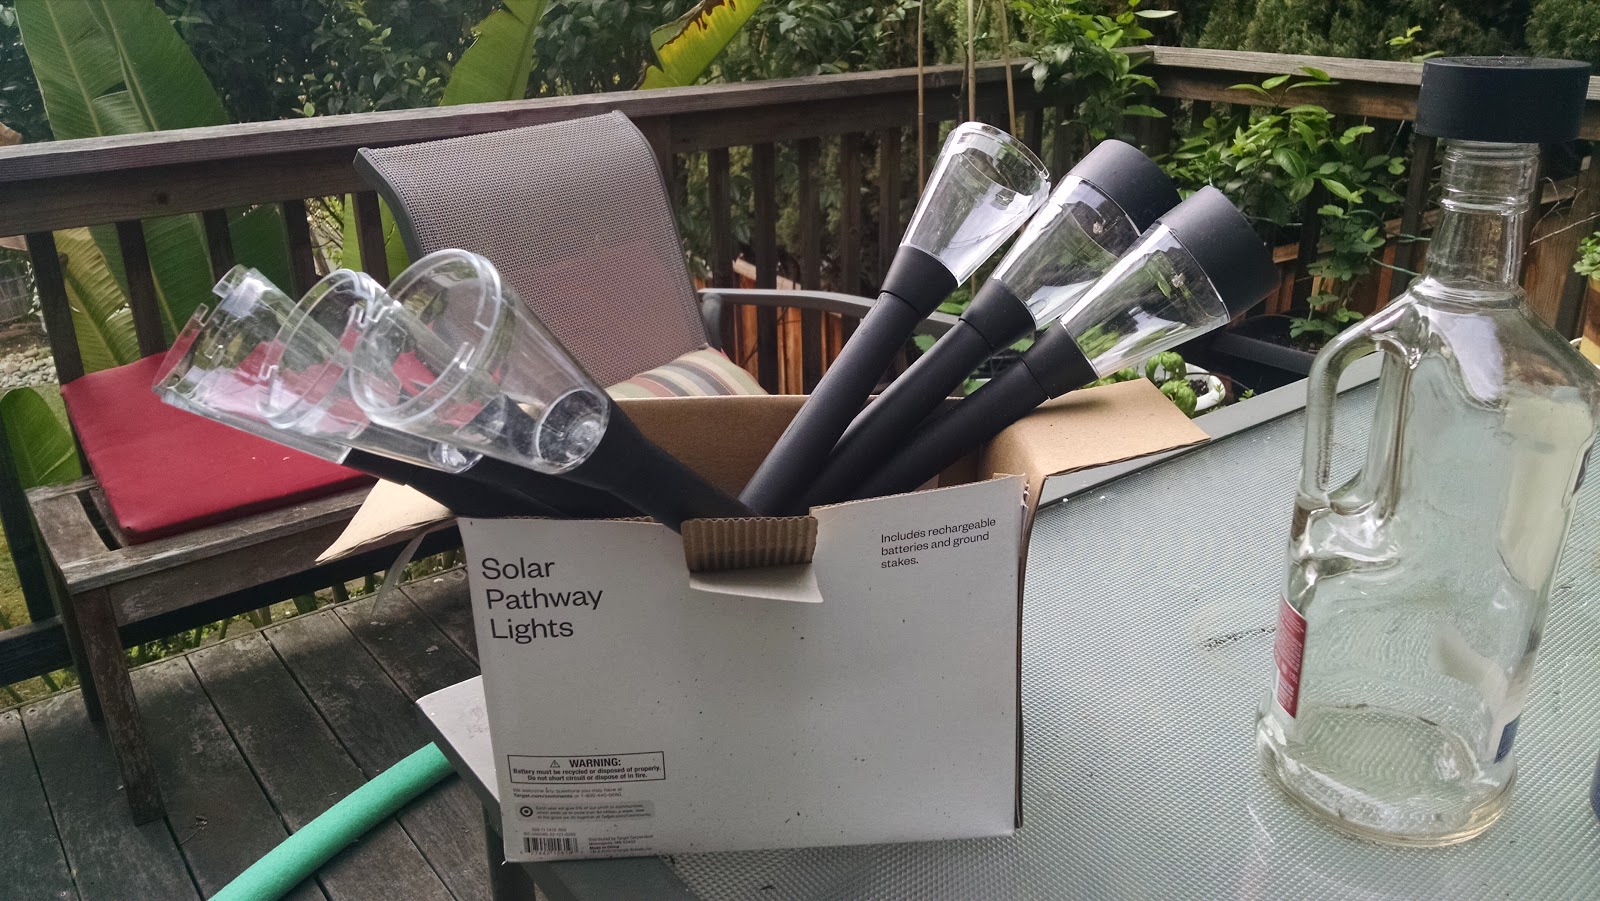
Step 3: Place the solar tops on the mouth of the bottles.

Step 4: Wait for it to get dark!

Voila! 


Saturday, September 5, 2015

Repurposed Jars - Glitter Lantern


I save pretty much all my glass jars, just in case a fun project comes up. Jam and jelly jars, peanut butter and pickle jars, olive and coconut oil jars! Each one is unique and will be great for some future repurposing project.

I hosted a large party where we decided to make small lanterns as the guest's party favor. It was a bonus that we could used the lanterns to decorate during the party, then they would help light the guests on their way home.

The best part of this project is that over a year later, I still see friends using this party favor in their homes or patios!

We used all different kinds of jars: pickle (bigger and squat), jam (wide mouthed and smaller), olives (taller with a wide mouth) and lots of pasta sauce jars. All the different shapes and sizes were fun to see!

Super Simple How To:
1. Soak the jars in soapy water to remove any glued labels, or use a knife to scrape off any remaining stickiness.

2. Once cleaned, I painted the insides of each jar with a mixture of watered down glue (or modge podge)and silver glitter. The glue will dry clear, so only the glitter is left behind. 

3. I then used crafting wire to wrap around the mouth and make a simple handle.

4. Add some fine sand to the bottom. Depending on the amount of glitter you may not be able to see much of what is inside the lantern.

5. Insert a battery tea lights, and watch it twinkle!


Wednesday, August 5, 2015

Hot Glue Glitter Letters

I think this is so cool, because you are literally making something from nothing! With just a few supplies and a couple of minutes, you have a beautiful sparkly letter. All you need is a hot glue gun and glitter.

I used a toothpick on a few of the letters, so I could later use them on a birthday cake. The others I attached a twine loop, so they could be hung. I think the neck of a wine or champagne bottle, as a gift tag. Or even hang the letters from the Christmas tree!

Once I started, I wanted to make more and kept thinking of new uses for them. But my hand got less steady, so I stopped at five letters. In the future, I may print out some pretty calligraphy to trace.

You could make symbols, or even numbers to top a birthday cake. What would you make with this  fun hot glue trick?


All you need:
* Hot glue gun, it takes a lot of glue so much sure you have refills
 * glitter
*toothpicks or twine, to attach to the letter
*scissors
*pencil

How to:
1. Draw out your letter on the parchment paper with a pencil
2. Trace the letter with your hot glue onto the parchment paper
3. Sprinkle glitter on the hot glue immediately. Don't touch the glue.
4. Stick the toothpick in bottom or place the twine on the letter while the glue is still hot
5. After the glue has completely cooled, go over the letter again with a thick layer of hot glue. Make sure to cover the toothpick or twine well.
6. Sprinkle with glitter again.
7. Once cooled, peel the letter from the parchment paper.

Step 5 in progress

Letters Complete


Monday, July 20, 2015

How To Clean Your Kicks (Shoes)

I have a few pairs of Converse that I love, but they are a few years old, well used and looking pretty beat up. I decided use a Magic Eraser on them and it worked perfectly! 

I like to cut off a smaller piece of the Magic Eraser and wet it. Then rub it on the white rubber areas of the shoe. Immediately all the dirt, grime and stains came off! As you can see, my shoes look almost new!


I love the black Converse All Stars, they go with everything. But I have them in a few other fun colors too.


Monday, January 26, 2015

Super Easy Chalkboard

Chalkboards are all the rage right now, and I've been using them to decorate for the holidays and parties in lots of different ways. But I've always found it a pain to have use chalkboard paint on these projects. I had a huge charity party I was responsible for decorating and I started thinking of how other black mediums would look with chalk. It needed to easy and inexpensive too! The three methods I use below held up really well and looked and reacted like a real chalkboard.


1. Butcher Paper
This could not have been easier! If you don't already have access to butch paper, it ~ $15 for 100ft roll that will last forever. The butch paper as chalkboard is perfect large projects, like my Selfie Wall. Test both sides of the paper and see which works best for your project. But for me, it worked as is. I also used butcher paper in the small gold photo frames. I have erased and reused a few times and the are great. (Note: I did not "season" the selfie wall and it worked great, but I usually do for all my other chalkboard projects)


2. Black Poster Board
Black Poster board worked great for me too, and available at big box stores like Target, RiteAid, etc. It is ~ $1 22"x28" sheets that will fit into poster frames you already own (I display my kids art work in large poster frames and removed them and replace it with the black poster board for the weekend. More substantial or ornamental frames would look even better). I used this method for large Menu Boards that I put on easels, and it turned out perfect! (Note: I did "season" the Black Poster Board and it made the look more authentic). 


3. Plain Old Black Paint
That's right... black paint works as a chalkboard too! It doesn't HAVE to be a special chalkboard paint. I used an old can of Glidden black paint on cardboard cutouts, and that I used for directional signs at the party. FOOD, BAR, RESTROOM, etc. Plain old black paint is much less expensive than chalkboard paint, so this was a big win for me! I was just experimenting, so if this didn't work it was just cardboard I was painting so. (Note: I did "season" the plan black paint, just like you would with chalkboard paint)


4. Traditional Chalkboard Spray Paint
Below I reused cookie and coffee tins to make Christmas gifts for the kids teachers. I used Chalkboard Spray Paint on these pieces, and you definitely need two coats of paint. I filled the coffee tin with a 1/2 lb of nice coffee beans, and the others with candies. So the paint works great too :) and I'll continue to use chalkboard spray paint on projects like this.


Thursday, November 13, 2014

Succulent Gardens: Table Top and Vertical


SUCCULENT GARDENs

Table Top Garden

Scanning garden magazines has given me so many ideas; I cannot keep up with them all.  Two such articles grabbed my interest and so I went to work on the creation of some succulent gardens.  My hubby, Mike, supports me in most all of my projects, especially in the out of doors.  
So I asked him to build a table top frame with legs and without a bottom; outside dimensions of 15" X 40".  We bought table legs and he screwed them into the bottom of the table-like frame he made. You can buy the receptacles at the hardware store and screw them into the bottom of the frame so the legs get screwed into these receptacles.  Then we dropped, into the bottom of top frame, a steel chicken nesting tray which had over 100 holes in the bottom for aeration where the chicken farmers would place straw on top.  The table top frame was made the size of the steel nesting tray so it all fit.
Right on the top of the steel chicken nesting screen, I put a double layer of burlap and then an inch layer of really good potting soil.  I searched the flea markets for old calf nursing buckets which originally would have a rubber nipple so the warm milk (mixed with ground grain) was gobbled down by baby calves.  Did I mention that I grew up on a Kansas farm?  That was just one of my jobs growing up on the farm.  We then found really old used water faucets and mounted them in the hole where the old rubber nipple used to be.  All of this was just for effect. I’ve used those old buckets in other places in the garden, along with my many vintage watering cans I collect.

Tabletop garden finished prior to planting
 

I also used other kinds of buckets, vintage watering cans and pots for the garden and planted the different kinds of succulents in the pots as well as into the garden soil surrounding the pots.  I painted the garden legs and frame a slate grayish blue color.  I live in planting Zone 7 and to protect my succulents I bring them into the house in the winter.  This section of our outdoor living area is a real joy to tend and the many varieties and colors of the succulents are a lovely addition to the patio.  The added fact that Succulents rarely need watering, maybe only once each week, may appeal to many.


VERTICAL SUCCULENT GARDEN
The other article on succulent gardens I picked up on in the gardening magazines, was how to build a Vertical Succulent garden...to hang on a garden wall. I like a good challenge so I wanted to tackle this idea.  So,  I found a good old oak drawer for $4 at an estate sale that had a little character.  Ever since I was a young girl, I’ve had this small drawer where I used to keep my diary and “secret” things hidden.  It came out of an antique secretary in my parent’s basement that was there when we bought the farm in 1947.  Mom probably wondered what happened to that little drawer which I am sure is well over 100 years old by now.
I drilled a couple of holes in the bottom of both drawers  in a couple of places but not sure that was necessary. I filled the boxes a little over 3/4th full of good potting soil and pressed it down.

Filling drawer with soil

Chicken wire can be purchased at hardware stores by the foot (and is 36" wide) and using sheet metal clippers I cut enough to fit each box plus about an inch more on all sides. Bending down the 1 inch on the inside of the box, I stapled the wire to the box on the inside of the box all the way around.

Stapling in the chicken wire


Hardwood drawer with brass inset pull
I then pushed succulents of all colors into and through the chicken wire. Just for aesthetics, I stuck in sphagnum moss through the wire and pulled some to the surface to cover up some of the wire.  It’s just that easy.  Oh yes, I screwed small metal cup hooks about 5 inches down on the outside on both sides so that I could make a hanger for the vertical boxes.
Succulents should maybe be watered once a week, so they are of little care.  Water lightly so that you do not wash out the plants.  I think birds from time to time like to carry off some of the sphagnum as I will find a plant or two on the ground under the box and missing sphagnum.  If you do not see yourself doing this from scratch, I did see boxes ready to plant on a bottom shelf at Home Depot in the gardening department.

Little Red Drawer

Friday, October 31, 2014

Cheap and Easy Treat Bags

Happy Halloween! As Mom and I are putting the new blog together, I am also getting ready for the Halloween party at my son's school. So I thought I'd share a super easy and cheap idea for treat sacks. I already had all the supplies I needed!

Supplies:
* Sharpie 

I traced around the cookie cutters to make the shape of ghost, bat and pumpkins. The kids will fill them with candy and prizes during the class party. How easy is that?!?

Same concept will work for any holiday or party! Most grocery store carries these paper lunch bags in white also, and I can see using a red sharpie with my Christmas cookie cutters.