Wednesday, December 17, 2014

Christmas Interior Decorations (Fireplace Mirror, Mantle and Staircase)


Decorating our Fireplace Mirror and Mantle

I love leafing through the decorating magazines and mentally get a picture of what I can do with my own home.  Several years ago, probably 14 or so, I saw this very lavish entry hall picture in a magazine that had magnificent decorations around the mirror and also on the entry table below the mirror.  I had obtained a large & lovely mirror when my home in Joplin had been used on the Historic Homes Tour.  So I purchased the mirror at cost since that is the way you can acquire beautiful items if you allow your home to be utilized for the tour...and all at cost.

So I took that idea from the magazine and for many years I've been decorating the mirror with Christmas decor and I've also added lights to the garland. Over the years I've updated the decor on the old garland with new, bright and shiny flowers and fruit but the white balls (string of lights have lasted through the years.  So here is the finished project, one taken at night with the lights on the garland and the other in the daytime without the lights.

Night time with garland lights plugged in

Daylight with garland lights unplugged

The iridescent and see through bows were made from a spool of ribbon I bought back in 1988 and each year I fluff them up and use them over and over.

Staircase Garland, Bows and Lights

When we moved to Tulsa in 2002 I was thrilled to have an open staircase once again and so totally remembered the beautifully decorated staircases from the home decorating magazines.  This picture is not the best angle, as my husband brings in from the outdoors in the winter, the 15' Ponytail Palm which stands in the open ceiling area at the base of the stairs.  So that blocks taking a picture of the entire staircase.  He loves his plants and I love him so the palm tree stays.

Stairway with lighted garland

I simply wrap inexpensive green garland with gold garland and I was fortunate to find the white ball lights again in a bigger size than I used on the fireplace mirror. I use the wire inside the green garland and wrap around the electrical cord to hold the lights in place. I made the large red bows from a large roll or ribbon purchased, of course, after Christmas on the 1/2 off specials. 
 I have large plastic totes where I keep one marked fireplace/mirror & mantle and another tote marked staircase decor.  
 I love the festive look of the staircase and fireplace/mirror decor.  I just put on the beautiful Christmas DVDs, light the fireplace, plug in the lights and my world becomes peaceful and golden in the midst of all the hustle and bustle of this time of year.


Sunday, December 14, 2014

Personalized Ornaments or Gift Tags


on the tree, next to my sister's ornament
Every year as we put our tree up it is fun to see the ornaments we have collected throughout the years. This year as I unpacked the ornaments, I surprised to find those that my sister Misha had made me. They were simple, but thoughtful, and I had not really given them much thought in the past. Except now she is gone, and they are a beautiful memory of her. To know that she took time to make something by hand for my family and ship it off to us is very special.  It was bittersweet. I can just see her, sitting in her living room with the supplies gathered around; curling ribbons and writing with paint markers in her pretty handwriting. Growing up we did a lot of homemade ornaments and she was carrying on that tradition.

So after reading a post at Rosemary and Thyme today, I realized I had everything I needed to make a few special ornaments for my friends and family! Hopefully they will think of us each year as they decorate their trees! This is a very simple project, I used our Clay Polymer that is pliable until baked for 15 minutes and rolled it out with a jar. After some thought and searching through all our cookie cutters, we decided to use a small jar lid to cut the circles and a straw to cut the twine hole. We had to do a custom shape for those with much longer names :) I recently bought a kit to imprint letters onto cookies and we used it to print each family's name. On the back I used a toothpick to hand draw a heart with the year '14.

finished product
the "fancy" version
a little personal touch on the back

the tools, before baking
Supplies:
Clay Polymer
Letters
Twine or ribbon
Roller - I used a small jar
Cookie Cutter/lid/sharp knife - to cut shapes
Straw - the perfect size to cut out the twine hole
Glitter and glue (optional)


Follow the directions for your clay on baking time and let them cool before tying on some pretty twine or ribbon. I decided to dress up a few, that I won't be sending via mail, with glitter around the edges.

I think they turned out so sweet, yet simple enough to go with any decorations. I will use them to wrap up a few gifts too. It was a good project to involve my boys too, and they made one for each of their teachers to include with a gift card.

Everything you need for your project:

Thursday, December 4, 2014

Dining Room Hutch Redo with Custom Red Chalk Paint

Isn't it amazing how in decorating we get one idea about one item we want to change that leads to something else and then....before we know it, we've changed everything.  Take for instance, this old pine table I saw across the street from a restaurant while having lunch with friends.  It was sitting on the sidewalk with several other vintage tables at this antique shop and of course I could not leave without dragging my friends across the street to get a closer look.  Long story short, I took Mike back, he loved it and we bought it after deciding to get rid of my lovely Asian style dinning room set with sideboard. But this meant that I had to have something to replace the sideboard which held all my good dishes and silver serving pieces.  We also picked up 4 kinda matching Windsor chairs for the pine table.
 In the meantime, we were emptying Mike's Mom's home in Carthage Missouri of the family furniture after she passed.  There was this old 1950s hutch that caught my eye and after deciding that yes, it could hold with modification all 4 sets of my plates, cups, bowls, and silverware.  I knew I had to put color to the old hutch though.  So this blog is about that undertaking, turning the old rough looking hutch into something that would give my dining room a kick in the pants!!

Hutch being unloaded of its wares prior to shipping to Tulsa


I'd never undertaken such a major project and without my own shop or place to work, it was necessary to take the deck and the kitchen dining area for different parts of the project.

First, like in all my furniture painting projects, I had to sand the top to always expose the beauty of the wood prior to painting the remainder of the hutch.  That's just something I always do with every piece I paint. Guess you would say it is my signature.  Amber typically does the same thing with her furniture painting as well.  The top would then later get 4 coats of satin MinWax varnish between all sandings.  Again, I used my handy orbital sander to get a great finish.  However, once the old varnish was off using the orbital sander, the other 3 sandings required a fine grit sandpaper which I did by hand, not using the sander....just gives a finer finish.

And the work has begun


All hinges and drawers and doors had to be removed and sanded separately.  I used low odor mineral spirits to clean off all of the old residue from the sanding process and then wiped it all clean with soft rags that wouldn't leave lint.  Below I've taken the project to the kitchen dining area where I used lots of drop cloths and when painting I put the legs up on short blocks of 2 X 4s.

Making your own Chalk Paint


There are a few already made Chalk Paints on the market; most all are quite expensive.  I make my own with the following recipe.  Mix 1/3 cup of Plaster of Paris and 1/3 Cup of cool water; stir until completely smooth.  Mix that with 1 cup of really good latex paint (Lowe's Valspar works great) and stir thoroughly.  This will make enough chalk-finish paint for one coat on a six-drawer dresser. I needed to use two coats of the red paint to get the depth of color I wanted. Chalk-finish paint should not be stored and reused.  If you have a smaller project, mix smaller amounts of plaster, paint, and water in the same proportions. 
I did not create a video for you to watch the process but there are many online that will tell you about the painting, the distressing of the wood to give it a worn look and finally the waxing of the entire project. They do not all use the same process however.  For the finish, you can either use a chalk paint wax or a wipe-on or brush-on poly for the finish. I used a chalk paint wax and a brush and then buffed off the wax by hand with a soft cloth (lint-free). This process gives a nice patina to the color of the finish paint.

Getting There....


This was not easy...getting in to all of the shelves and backboard


Sanding and painting shelves on top of the hutch probably took the most time and was one of the most difficult of the entire process.

Ready to Wax the Chalk Paint


The knobs to the red China cabinet I had purchased in 1993 (see picture below) were wooden. I replaced the wooden knobs with a beautiful find from Anthropology.  But they no longer carry the same beautiful red knobs. However a trip to Hobby Lobby here in Tulsa to sort through their dozens upon dozens of beautiful choices for drawer pulls, produced an almost identical pull.  YES!!!

The two drawers had no dividers so Mike and I made dividers to hold the silver ware and serving pieces.

One drawer completed


I enjoyed the distressing part and if you've not done this, just take torn pieces of a medium grit sand paper and hit the places where wear and tear might happen. That would be around edges, stand out decor and really...any other place that strikes your fancy to add to the charm of the piece.  You wax the furniture piece after you distress it so you still need to wipe down any paint you've loosened.

One door completed


The top two shelves of the upper part of the hutch had groves for the plates to be displayed, but the top of the lower part of the hutch itself had no grooves to place a third row of plates.  I found a long strip of natural grain molding that matched the maple top of the lower part of the hutch and glued it in place ... just enough so that I could stand up another row of plates.  That way, my entire set of my best serving pieces were on display.  More than one way to "skin a cat..." as my sweet Mother used to say!
Hutch in place prior to bottom plates were on display so that you can see both the newly completed red hutch along with red China cabinet I've had since about 1993.

And there you go!  Really glad to finish this project


I am so glad that I chose this project.  It was fun, tested my patience and I learned so much.  I've got a really great old chair that will sit at the end of the pine table.  It is going to get a coat of matching red chalk paint soon.  But that is another day.  When that is done, there will be a post for the pine table, the Windsor chairs and the funky cushions that puts the icing on the cake.


Wednesday, December 3, 2014

Christmas Decorations for Outside on a Budget


Beautiful Christmas Home Decor for Outside

For several years I've been putting time into decorating the outside of my home with garland, bows, Christmas balls.  You can do this and you do not need to spend an arm and a leg buying already "fancied-up" and expensive garland.  I buy the inexpensive garland, wrap it with lights, tie on a couple sizes of Christmas balls (red) and join it at the top with a pretty 36" decorative swag. The swag below was already decorated with glittery balls and artificial fruit and gold twigs.  I joined the two sides of the garland and the top swag with the two strings of LED lights (any lights will do but less chance of burn out when using LED lights).  Note that I made a big burgundy bow, fastened it high about the door with a couple of green velvet and gold streamers for a more elegant effect.
When I first put this together about 10 years ago, I found really large white cup hooks and they stay mounted up either side of the door (4 on each side) year round. I put three above the door frame, another up high for the burgundy bow and four down either side of the door frame. The hooks keep everything from blowing in the wind and the garland close to the door frame. I hide the bottom of the string of lights under the porch door mat and the outside plug is close to the door. I do not bother to unplug it during the day time.  And by the way, the wreath was really really inexpensive, but elegant.

Close Up for Top of Door


Entire Door Decoration


Garage Light Wreath


The Garage Light Wreaths are quite inexpensive and I just wrap them with left over gold garland and found inexpensive bows at a close-out sale.  I just slide them up over the bottom of the light and push hard for them to fit over and behind the top back of the light.  They are simple but really add much color and festiveness.

Garden Gate


For a couple of years now I've been putting a bouquet on my Garden Gate with very little thought.  Because we have done extensive work in our back yard this summer, I wanted to enhance the outside approach to the backyard by fancying up the Garden Gate.  I had a gallon of miss-mixed paint I picked up at Home Depot for $5 that I've used for several projects and figured it would be 
appropriate for the garden gate.  The hardware on the gate are all estate sale and flea market finds that I had been collecting.  This summer I put a mixed bouquet of artificial summer flowers in a basket
to hang on hooks attached to the gate.  I've just taken down the basket of artificial fall flowers and
hung the Christmas wreath, a little bigger than the garage light wreaths, but used the same bow.
I've had the wreaths for many projects over the years, but now I am sure they will have a permanent
Holiday Home!

So for your own home....you've got time to do this and above all you can keep your expenses really low. You've probably got all you need right now in your attic or stored in the garage in forgotten boxes. Your guests will arrive with a feeling of being warmly welcomed and your neighbors will
appreciate the beautiful addition to the neighborhood.


Sunday, November 23, 2014

Rewiring old lamps & making new fabric shades...Yes you can!!

Rewiring old table and floor lamps - Yes you can!


VINTAGE LAMPS
Blow off the dust, replace the old wire, decorate a new shade and "ta da" you have a new lovely!

Refurbishing old lamps caught my fancy several years ago.  The second hand stores were full of a forgotten era of 1930's and 40's lamps (some floor lamps & some table lamps) where I saw a lot of beauty.  Parts were missing, cords were old and rotting and the shades were long gone.  A co-worker told me how easy it was to rewire lamps and that was all I needed to take an old lamp I had acquired from a friend moving to Oregon, and give it new life.  I bought an electrical wiring book at a yard sale and learned the simple truths of rewiring cast-off old lamps, giving a second life to beautiful vintage pieces, long forgotten. Today you can go right to the internet and youtube, so I've copied a link here for you to see how to rewire lamps and learn.  I've now given reworked and beautified old lamps to family and friends and sold some in my booth at the Dewey Street Market in Sapulpa, OK.

I have a new project on a couple of really old darling, probably 1930s or 40's dresser lamps.  Mike's Mom passed in 2013 and was a collector of beautiful dish and glassware and we've spent hours going through these beautiful pieces.  These two really sweet dresser lamps came out of a dusty old box in the family's attic and I immediately saw the vintage quality and beauty. Small, decorative lamps were a mainstay in a ladies' dressing room in times past.  They were, of course really dirty, but there were no scratchs or chips so, I cut out the old cords, removed all of the old electrical parts and fittings and put the glass lamps to soak....and OH! did they sparkle.


The next job was to rewire these lamps and using a dark electrical cord was definitely not an option on these two sweet dainty lamps.  I found a clear see-through cord with silver wire and rewired the lamp.  I chose silver wire as the bulb bases were silver.  I asked Mike's sister Debbie if she remembered these lamps and she said definitely as they were on her Mom's dresser for several years and remembered that the shades were fabric and not glass.  Lowes carried these drum-type small shades and I picked them up for about $6 each.  You can pay a small fortune for shades if you buy them at a lamp specialty shop.  Even for this size, you'd pay around $30 each.
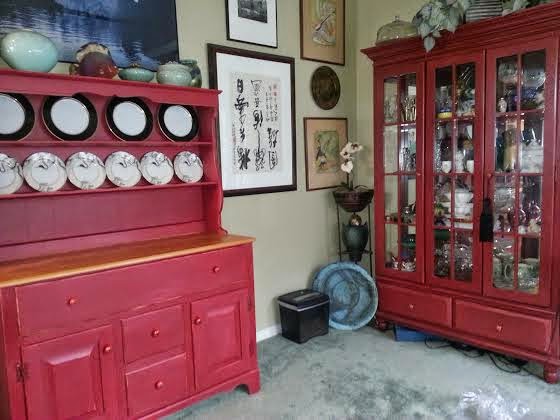
I lived with the lamps and shades for a while and decided where I wanted to make their permanent home, at least for now and that was on the old hutch that also came out of Mike's Mom home as we prepared to put the house on the market.  I've chalk painted that hutch a China red and this will be another post in the near future.  Once I'd decided where the lamps would go, dictated how I was going to decorate and cover the shades.  I'm not very fond of plain shades and generally cover them with fabric and trim to fit a special place.


Side Note......I bought the above chair at the Tulsa Flea Market a few years back as I saw some something about it that I liked.  It had good bones and some character although the seat was black naugahyde and the wood frame was just a varnished wood. Really pretty ugly at first viewing, but I liked the cane back.  So I talked the owner into selling it as it was his seat at the flea market.  Picked it up for about $17, $10 less than the seller wanted to sell it to me.  I had a gallon of red paint I picked up at Home Depot for $5 as it had been miss mixed.  I love finding these paint bargains and snatch them up if the color is odd and a little different as there will always be a project, if not now then later.  Once I'd decided on the red paint for the chair to match my red China cupboard, I ran to my favorite fabric store as I had already eyed this Asian-type fabric.  Sorry to take you around the barn, so to speak, about the chair....but the left over scraps of fabric were the perfect answer for the vintage dresser lamp's shades and will go in our dining room along with the chair.

Small Drum-type Shade, Fabric and Trim (chocolate)
Chocolate Trim picked up at an Estate Sale for $1.50 for 6 yards. YES!!!!

I will be using fabric glue for the shade to adhere the fabric and the brown chocolate trim which is called gimp.  I have covered many shades with fabric and glue and have these handy tiny hair clips, miniature, to hold the fabric and gimp in place while the glue dries.  I will need to make a small pleat in the fabric as I glue it around the drum shade as it has just a slight flare to the shape.  This process keeps the fabric aligned.  Now you know why many shades have the fabric pleated. Note the little hair clamp I've used here at the top to hold the glued fabric in place while I work my way around the entire lamp and while folding in the pleats.

Holding, clamping, pleating and gluing the fabric


Gluing on the trim also using the tiny hair clamps


And there you go
(This red hutch is topic of another post on chalk painting)


Another Vintage Floor Lamp Rewired w/Newly Covered Shade
Now that these little lamp shades are finished, I wanted to share how you can also cover a shade with fabric if the shade is great flared/fluted. Using brown paper as a pattern, I trace over the fabric already on the shade and make enough gores to cover the lamp.  It is best if the pieces of wedge-shaped fabric just meets each other wedge.  This is so that when you glue your decorative trim (gimp, ribbon, etc) over the seams where the wedges meet, there will be no bulk.  Again, use the little tiny hair clips to hold the fabric in place on the inside of the shade, top and bottom.

Newly Covered Shade With Trim Hiding Glued Seams

This particular old floor lamp has a green marble decoration in the middle of the shaft, thus I used a soft green color for the lamp shade.

Vintage Floor Lamp Rewired w/Newly Covered Shade

Now its your turn to try your hand. You can find all sorts of lamp parts, cords, harps, sockets, wire strippers at any hardware store.  I guarantee that you'll feel great knowing you can do this!!


Thursday, November 20, 2014

Repurposed Altoid Tins


I love reusing and repurposing old coffee and altoid tins. The Altoid Tins make great gift card holders! Imagine including your next birthday or Christmas gift card in one of these! But I also like to use them as emergency kits to carry your purse or child's backpack. Include a few band-aides, safety pins, ear plugs, ear buds etc.

In the picture, two of the tins I have Modge Podged and covered with paper. The yellow chevron I printed myself and added my initials, which would make for a great personalized gift. The red chevron I used wrapping paper. Both I hand painted the top edge with craft paint, since wrapping the paper over the edge would have prevented the tin from closing properly.

For the Glittered Tin, I first spray painted it. When dry, I then covered the lid with a watered down glue and glitter. I did a few layers and then when complete dry, I covered with just the watered down glue. That will prevent the glitter from falling off.

I love these little tins!
Before and Afters

The BEFORE Tins
I save tins of all tins for projects and will be covering a few more projects for cookie and tea tins soon, so check back.

Thursday, November 13, 2014

Succulent Gardens: Table Top and Vertical


SUCCULENT GARDENs

Table Top Garden

Scanning garden magazines has given me so many ideas; I cannot keep up with them all.  Two such articles grabbed my interest and so I went to work on the creation of some succulent gardens.  My hubby, Mike, supports me in most all of my projects, especially in the out of doors.  
So I asked him to build a table top frame with legs and without a bottom; outside dimensions of 15" X 40".  We bought table legs and he screwed them into the bottom of the table-like frame he made. You can buy the receptacles at the hardware store and screw them into the bottom of the frame so the legs get screwed into these receptacles.  Then we dropped, into the bottom of top frame, a steel chicken nesting tray which had over 100 holes in the bottom for aeration where the chicken farmers would place straw on top.  The table top frame was made the size of the steel nesting tray so it all fit.
Right on the top of the steel chicken nesting screen, I put a double layer of burlap and then an inch layer of really good potting soil.  I searched the flea markets for old calf nursing buckets which originally would have a rubber nipple so the warm milk (mixed with ground grain) was gobbled down by baby calves.  Did I mention that I grew up on a Kansas farm?  That was just one of my jobs growing up on the farm.  We then found really old used water faucets and mounted them in the hole where the old rubber nipple used to be.  All of this was just for effect. I’ve used those old buckets in other places in the garden, along with my many vintage watering cans I collect.

Tabletop garden finished prior to planting
 

I also used other kinds of buckets, vintage watering cans and pots for the garden and planted the different kinds of succulents in the pots as well as into the garden soil surrounding the pots.  I painted the garden legs and frame a slate grayish blue color.  I live in planting Zone 7 and to protect my succulents I bring them into the house in the winter.  This section of our outdoor living area is a real joy to tend and the many varieties and colors of the succulents are a lovely addition to the patio.  The added fact that Succulents rarely need watering, maybe only once each week, may appeal to many.


VERTICAL SUCCULENT GARDEN
The other article on succulent gardens I picked up on in the gardening magazines, was how to build a Vertical Succulent garden...to hang on a garden wall. I like a good challenge so I wanted to tackle this idea.  So,  I found a good old oak drawer for $4 at an estate sale that had a little character.  Ever since I was a young girl, I’ve had this small drawer where I used to keep my diary and “secret” things hidden.  It came out of an antique secretary in my parent’s basement that was there when we bought the farm in 1947.  Mom probably wondered what happened to that little drawer which I am sure is well over 100 years old by now.
I drilled a couple of holes in the bottom of both drawers  in a couple of places but not sure that was necessary. I filled the boxes a little over 3/4th full of good potting soil and pressed it down.

Filling drawer with soil

Chicken wire can be purchased at hardware stores by the foot (and is 36" wide) and using sheet metal clippers I cut enough to fit each box plus about an inch more on all sides. Bending down the 1 inch on the inside of the box, I stapled the wire to the box on the inside of the box all the way around.

Stapling in the chicken wire


Hardwood drawer with brass inset pull
I then pushed succulents of all colors into and through the chicken wire. Just for aesthetics, I stuck in sphagnum moss through the wire and pulled some to the surface to cover up some of the wire.  It’s just that easy.  Oh yes, I screwed small metal cup hooks about 5 inches down on the outside on both sides so that I could make a hanger for the vertical boxes.
Succulents should maybe be watered once a week, so they are of little care.  Water lightly so that you do not wash out the plants.  I think birds from time to time like to carry off some of the sphagnum as I will find a plant or two on the ground under the box and missing sphagnum.  If you do not see yourself doing this from scratch, I did see boxes ready to plant on a bottom shelf at Home Depot in the gardening department.

Little Red Drawer

Aluminum Kitchen Stool Rehab

Here is a super simple, but really stylish update for the kitchen: Aluminum Stools, done with spray paint. Originally the kitchen stools looked like this. We purchased them 19 years ago, so I have certainly gotten my use out of them.  
Before - Before Stools
4+ years ago they needed a little sprucing up, natural wood tops had yellowed and the paint was chipped. After a good cleaning, I repainted the whole stool white. I printed off a Fleur de Lis from some online clipart, traced around it and painted it in with a pretty blue. I loved them like this!


But I was ready to try something new and had been admiring the new aluminum and metal stools I've seen around and wanted to copy the affect. I thought about buying new stools, but I already have two perfectly good ones, so why not paint them!

 I started by cleaning and sanding the stools and used a spray paint (Krylon Metallic Matte Aluminum) I already had. I always use a Spray Grip when I spray paint, and I LOVE mine! I started on the bottom and always make sure to shake my spray paint cans really well. I spray back and forth in a line, starting and finishing off my piece. I stop a few times in the middle to shake my can again.


Once the bottoms and insides were complete, I flipped the stools over and worked on the top and edges. Since I had painted these before, I knew where all the wear would show on them. After two good coats of the Aluminum paint,  I did a coat of clear finish and a 2nd clear finish coat just on just the heavy use areas (seat top and edges, spindles)


And here they are, the beautiful finished product! These get very high use in my household, so I hope they hold up well. They have definitely inspired me to find a few more metallic paint projects, what about you?!

Sunday, November 9, 2014

Copper Dipped Basket - Spray Paint Method


I like to use baskets to store things around the house: toys, magazines, blankets. I pick them up when I see them on sale, even if I don't *NEED* another basket. 

Recently I've noticed the trend of the "Dipped" Basket, where it looks like you have dipped part of the basket in paint, and wanted to give it a try. I was holding out until I found the right basket and was really set on a color and I'm so glad I did!
INSPIRATION - From Martha Stewart
I used my Krylon Copper Brilliance (that I finally found at Michaels and three other stores were out) spray paint and it worked great! Several of the instructions I saw involved pour paint in a bucket and actually dipped your basket in. But that seemed like a huge effort and waste. The spray paint method worked really well.

I turned my basket upside down and used blue painters tape to mark the area I wanted painted. Then I taped on newspaper to cover the area I did not want painted. My basket was very "nubby" so the paint didn't stick very well and I was worried that it would make a clean line. But it turned out just like I wanted! My only regret is that I didn't start higher up on the basket to make it more dramatic. It is subtle and adds just a tiny bit of sparkle to my living room


 Click HERE to see my other projects with Copper Spray Paint