
Isn't it amazing how in decorating we get one idea about one item we want to change that leads to something else and then....before we know it, we've changed everything. Take for instance, this old pine table I saw across the street from a restaurant while having lunch with friends. It was sitting on the sidewalk with several other vintage tables at this antique shop and of course I could not leave without dragging my friends across the street to get a closer look. Long story short, I took Mike back, he loved it and we bought it after deciding to get rid of my lovely Asian style dinning room set with sideboard. But this meant that I had to have something to replace the sideboard which held all my good dishes and silver serving pieces. We also picked up 4 kinda matching Windsor chairs for the pine table.
In the meantime, we were emptying Mike's Mom's home in Carthage Missouri of the family furniture after she passed. There was this old 1950s hutch that caught my eye and after deciding that yes, it could hold with modification all 4 sets of my plates, cups, bowls, and silverware. I knew I had to put color to the old hutch though. So this blog is about that undertaking, turning the old rough looking hutch into something that would give my dining room a kick in the pants!!

Hutch being unloaded of its wares prior to shipping to Tulsa
I'd never undertaken such a major project and without my own shop or place to work, it was necessary to take the deck and the kitchen dining area for different parts of the project.
First, like in all my furniture painting projects, I had to sand the top to always expose the beauty of the wood prior to painting the remainder of the hutch. That's just something I always do with every piece I paint. Guess you would say it is my signature. Amber typically does the same thing with her furniture painting as well. The top would then later get 4 coats of satin MinWax varnish between all sandings. Again, I used my handy orbital sander to get a great finish. However, once the old varnish was off using the orbital sander, the other 3 sandings required a fine grit sandpaper which I did by hand, not using the sander....just gives a finer finish.
And the work has begun

All hinges and drawers and doors had to be removed and sanded separately. I used low odor mineral spirits to clean off all of the old residue from the sanding process and then wiped it all clean with soft rags that wouldn't leave lint. Below I've taken the project to the kitchen dining area where I used lots of drop cloths and when painting I put the legs up on short blocks of 2 X 4s.
Making your own Chalk Paint

There are a few already made Chalk Paints on the market; most all are quite expensive. I make my own with the following recipe. Mix 1/3 cup of Plaster of Paris and 1/3 Cup of cool water; stir until completely smooth. Mix that with 1 cup of really good latex paint (Lowe's Valspar works great) and stir thoroughly. This will make enough chalk-finish paint for one coat on a six-drawer dresser. I needed to use two coats of the red paint to get the depth of color I wanted. Chalk-finish paint should not be stored and reused. If you have a smaller project, mix smaller amounts of plaster, paint, and water in the same proportions.
I did not create a video for you to watch the process but there are many online that will tell you about the painting, the distressing of the wood to give it a worn look and finally the waxing of the entire project. They do not all use the same process however. For the finish, you can either use a chalk paint wax or a wipe-on or brush-on poly for the finish. I used a chalk paint wax and a brush and then buffed off the wax by hand with a soft cloth (lint-free). This process gives a nice patina to the color of the finish paint.
Getting There....

This was not easy...getting in to all of the shelves and backboard

Sanding and painting shelves on top of the hutch probably took the most time and was one of the most difficult of the entire process.
Ready to Wax the Chalk Paint

The knobs to the red China cabinet I had purchased in 1993 (see picture below) were wooden. I replaced the wooden knobs with a beautiful find from Anthropology. But they no longer carry the same beautiful red knobs. However a trip to Hobby Lobby here in Tulsa to sort through their dozens upon dozens of beautiful choices for drawer pulls, produced an almost identical pull. YES!!!
The two drawers had no dividers so Mike and I made dividers to hold the silver ware and serving pieces.
One drawer completed

I enjoyed the distressing part and if you've not done this, just take torn pieces of a medium grit sand paper and hit the places where wear and tear might happen. That would be around edges, stand out decor and really...any other place that strikes your fancy to add to the charm of the piece. You wax the furniture piece after you distress it so you still need to wipe down any paint you've loosened.
One door completed

The top two shelves of the upper part of the hutch had groves for the plates to be displayed, but the top of the lower part of the hutch itself had no grooves to place a third row of plates. I found a long strip of natural grain molding that matched the maple top of the lower part of the hutch and glued it in place ... just enough so that I could stand up another row of plates. That way, my entire set of my best serving pieces were on display. More than one way to "skin a cat..." as my sweet Mother used to say!
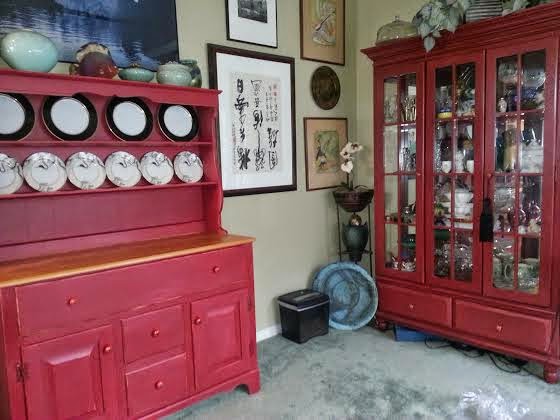
Hutch in place prior to bottom plates were on display so that you can see both the newly completed red hutch along with red China cabinet I've had since about 1993.
And there you go! Really glad to finish this project
I am so glad that I chose this project. It was fun, tested my patience and I learned so much. I've got a really great old chair that will sit at the end of the pine table. It is going to get a coat of matching red chalk paint soon. But that is another day. When that is done, there will be a post for the pine table, the Windsor chairs and the funky cushions that puts the icing on the cake.

No comments:
Post a Comment