Sunday, November 23, 2014

Rewiring old lamps & making new fabric shades...Yes you can!!

Rewiring old table and floor lamps - Yes you can!


VINTAGE LAMPS
Blow off the dust, replace the old wire, decorate a new shade and "ta da" you have a new lovely!

Refurbishing old lamps caught my fancy several years ago.  The second hand stores were full of a forgotten era of 1930's and 40's lamps (some floor lamps & some table lamps) where I saw a lot of beauty.  Parts were missing, cords were old and rotting and the shades were long gone.  A co-worker told me how easy it was to rewire lamps and that was all I needed to take an old lamp I had acquired from a friend moving to Oregon, and give it new life.  I bought an electrical wiring book at a yard sale and learned the simple truths of rewiring cast-off old lamps, giving a second life to beautiful vintage pieces, long forgotten. Today you can go right to the internet and youtube, so I've copied a link here for you to see how to rewire lamps and learn.  I've now given reworked and beautified old lamps to family and friends and sold some in my booth at the Dewey Street Market in Sapulpa, OK.

I have a new project on a couple of really old darling, probably 1930s or 40's dresser lamps.  Mike's Mom passed in 2013 and was a collector of beautiful dish and glassware and we've spent hours going through these beautiful pieces.  These two really sweet dresser lamps came out of a dusty old box in the family's attic and I immediately saw the vintage quality and beauty. Small, decorative lamps were a mainstay in a ladies' dressing room in times past.  They were, of course really dirty, but there were no scratchs or chips so, I cut out the old cords, removed all of the old electrical parts and fittings and put the glass lamps to soak....and OH! did they sparkle.


The next job was to rewire these lamps and using a dark electrical cord was definitely not an option on these two sweet dainty lamps.  I found a clear see-through cord with silver wire and rewired the lamp.  I chose silver wire as the bulb bases were silver.  I asked Mike's sister Debbie if she remembered these lamps and she said definitely as they were on her Mom's dresser for several years and remembered that the shades were fabric and not glass.  Lowes carried these drum-type small shades and I picked them up for about $6 each.  You can pay a small fortune for shades if you buy them at a lamp specialty shop.  Even for this size, you'd pay around $30 each.
I lived with the lamps and shades for a while and decided where I wanted to make their permanent home, at least for now and that was on the old hutch that also came out of Mike's Mom home as we prepared to put the house on the market.  I've chalk painted that hutch a China red and this will be another post in the near future.  Once I'd decided where the lamps would go, dictated how I was going to decorate and cover the shades.  I'm not very fond of plain shades and generally cover them with fabric and trim to fit a special place.


Side Note......I bought the above chair at the Tulsa Flea Market a few years back as I saw some something about it that I liked.  It had good bones and some character although the seat was black naugahyde and the wood frame was just a varnished wood. Really pretty ugly at first viewing, but I liked the cane back.  So I talked the owner into selling it as it was his seat at the flea market.  Picked it up for about $17, $10 less than the seller wanted to sell it to me.  I had a gallon of red paint I picked up at Home Depot for $5 as it had been miss mixed.  I love finding these paint bargains and snatch them up if the color is odd and a little different as there will always be a project, if not now then later.  Once I'd decided on the red paint for the chair to match my red China cupboard, I ran to my favorite fabric store as I had already eyed this Asian-type fabric.  Sorry to take you around the barn, so to speak, about the chair....but the left over scraps of fabric were the perfect answer for the vintage dresser lamp's shades and will go in our dining room along with the chair.

Small Drum-type Shade, Fabric and Trim (chocolate)
Chocolate Trim picked up at an Estate Sale for $1.50 for 6 yards. YES!!!!

I will be using fabric glue for the shade to adhere the fabric and the brown chocolate trim which is called gimp.  I have covered many shades with fabric and glue and have these handy tiny hair clips, miniature, to hold the fabric and gimp in place while the glue dries.  I will need to make a small pleat in the fabric as I glue it around the drum shade as it has just a slight flare to the shape.  This process keeps the fabric aligned.  Now you know why many shades have the fabric pleated. Note the little hair clamp I've used here at the top to hold the glued fabric in place while I work my way around the entire lamp and while folding in the pleats.

Holding, clamping, pleating and gluing the fabric


Gluing on the trim also using the tiny hair clamps


And there you go
(This red hutch is topic of another post on chalk painting)


Another Vintage Floor Lamp Rewired w/Newly Covered Shade
Now that these little lamp shades are finished, I wanted to share how you can also cover a shade with fabric if the shade is great flared/fluted. Using brown paper as a pattern, I trace over the fabric already on the shade and make enough gores to cover the lamp.  It is best if the pieces of wedge-shaped fabric just meets each other wedge.  This is so that when you glue your decorative trim (gimp, ribbon, etc) over the seams where the wedges meet, there will be no bulk.  Again, use the little tiny hair clips to hold the fabric in place on the inside of the shade, top and bottom.

Newly Covered Shade With Trim Hiding Glued Seams

This particular old floor lamp has a green marble decoration in the middle of the shaft, thus I used a soft green color for the lamp shade.

Vintage Floor Lamp Rewired w/Newly Covered Shade

Now its your turn to try your hand. You can find all sorts of lamp parts, cords, harps, sockets, wire strippers at any hardware store.  I guarantee that you'll feel great knowing you can do this!!


Thursday, November 20, 2014

Repurposed Altoid Tins


I love reusing and repurposing old coffee and altoid tins. The Altoid Tins make great gift card holders! Imagine including your next birthday or Christmas gift card in one of these! But I also like to use them as emergency kits to carry your purse or child's backpack. Include a few band-aides, safety pins, ear plugs, ear buds etc.

In the picture, two of the tins I have Modge Podged and covered with paper. The yellow chevron I printed myself and added my initials, which would make for a great personalized gift. The red chevron I used wrapping paper. Both I hand painted the top edge with craft paint, since wrapping the paper over the edge would have prevented the tin from closing properly.

For the Glittered Tin, I first spray painted it. When dry, I then covered the lid with a watered down glue and glitter. I did a few layers and then when complete dry, I covered with just the watered down glue. That will prevent the glitter from falling off.

I love these little tins!
Before and Afters

The BEFORE Tins
I save tins of all tins for projects and will be covering a few more projects for cookie and tea tins soon, so check back.

Thursday, November 13, 2014

Succulent Gardens: Table Top and Vertical


SUCCULENT GARDENs

Table Top Garden

Scanning garden magazines has given me so many ideas; I cannot keep up with them all.  Two such articles grabbed my interest and so I went to work on the creation of some succulent gardens.  My hubby, Mike, supports me in most all of my projects, especially in the out of doors.  
So I asked him to build a table top frame with legs and without a bottom; outside dimensions of 15" X 40".  We bought table legs and he screwed them into the bottom of the table-like frame he made. You can buy the receptacles at the hardware store and screw them into the bottom of the frame so the legs get screwed into these receptacles.  Then we dropped, into the bottom of top frame, a steel chicken nesting tray which had over 100 holes in the bottom for aeration where the chicken farmers would place straw on top.  The table top frame was made the size of the steel nesting tray so it all fit.
Right on the top of the steel chicken nesting screen, I put a double layer of burlap and then an inch layer of really good potting soil.  I searched the flea markets for old calf nursing buckets which originally would have a rubber nipple so the warm milk (mixed with ground grain) was gobbled down by baby calves.  Did I mention that I grew up on a Kansas farm?  That was just one of my jobs growing up on the farm.  We then found really old used water faucets and mounted them in the hole where the old rubber nipple used to be.  All of this was just for effect. I’ve used those old buckets in other places in the garden, along with my many vintage watering cans I collect.

Tabletop garden finished prior to planting
 

I also used other kinds of buckets, vintage watering cans and pots for the garden and planted the different kinds of succulents in the pots as well as into the garden soil surrounding the pots.  I painted the garden legs and frame a slate grayish blue color.  I live in planting Zone 7 and to protect my succulents I bring them into the house in the winter.  This section of our outdoor living area is a real joy to tend and the many varieties and colors of the succulents are a lovely addition to the patio.  The added fact that Succulents rarely need watering, maybe only once each week, may appeal to many.


VERTICAL SUCCULENT GARDEN
The other article on succulent gardens I picked up on in the gardening magazines, was how to build a Vertical Succulent garden...to hang on a garden wall. I like a good challenge so I wanted to tackle this idea.  So,  I found a good old oak drawer for $4 at an estate sale that had a little character.  Ever since I was a young girl, I’ve had this small drawer where I used to keep my diary and “secret” things hidden.  It came out of an antique secretary in my parent’s basement that was there when we bought the farm in 1947.  Mom probably wondered what happened to that little drawer which I am sure is well over 100 years old by now.
I drilled a couple of holes in the bottom of both drawers  in a couple of places but not sure that was necessary. I filled the boxes a little over 3/4th full of good potting soil and pressed it down.

Filling drawer with soil

Chicken wire can be purchased at hardware stores by the foot (and is 36" wide) and using sheet metal clippers I cut enough to fit each box plus about an inch more on all sides. Bending down the 1 inch on the inside of the box, I stapled the wire to the box on the inside of the box all the way around.

Stapling in the chicken wire


Hardwood drawer with brass inset pull
I then pushed succulents of all colors into and through the chicken wire. Just for aesthetics, I stuck in sphagnum moss through the wire and pulled some to the surface to cover up some of the wire.  It’s just that easy.  Oh yes, I screwed small metal cup hooks about 5 inches down on the outside on both sides so that I could make a hanger for the vertical boxes.
Succulents should maybe be watered once a week, so they are of little care.  Water lightly so that you do not wash out the plants.  I think birds from time to time like to carry off some of the sphagnum as I will find a plant or two on the ground under the box and missing sphagnum.  If you do not see yourself doing this from scratch, I did see boxes ready to plant on a bottom shelf at Home Depot in the gardening department.

Little Red Drawer

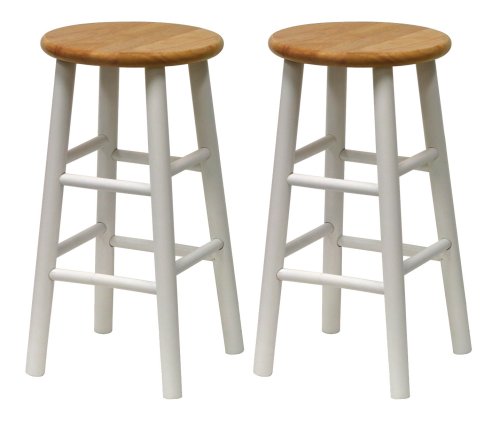
Aluminum Kitchen Stool Rehab

Here is a super simple, but really stylish update for the kitchen: Aluminum Stools, done with spray paint. Originally the kitchen stools looked like this. We purchased them 19 years ago, so I have certainly gotten my use out of them.  
Before - Before Stools
4+ years ago they needed a little sprucing up, natural wood tops had yellowed and the paint was chipped. After a good cleaning, I repainted the whole stool white. I printed off a Fleur de Lis from some online clipart, traced around it and painted it in with a pretty blue. I loved them like this!


But I was ready to try something new and had been admiring the new aluminum and metal stools I've seen around and wanted to copy the affect. I thought about buying new stools, but I already have two perfectly good ones, so why not paint them!

 I started by cleaning and sanding the stools and used a spray paint (Krylon Metallic Matte Aluminum) I already had. I always use a Spray Grip when I spray paint, and I LOVE mine! I started on the bottom and always make sure to shake my spray paint cans really well. I spray back and forth in a line, starting and finishing off my piece. I stop a few times in the middle to shake my can again.


Once the bottoms and insides were complete, I flipped the stools over and worked on the top and edges. Since I had painted these before, I knew where all the wear would show on them. After two good coats of the Aluminum paint,  I did a coat of clear finish and a 2nd clear finish coat just on just the heavy use areas (seat top and edges, spindles)


And here they are, the beautiful finished product! These get very high use in my household, so I hope they hold up well. They have definitely inspired me to find a few more metallic paint projects, what about you?!

Sunday, November 9, 2014

Copper Dipped Basket - Spray Paint Method


I like to use baskets to store things around the house: toys, magazines, blankets. I pick them up when I see them on sale, even if I don't *NEED* another basket. 

Recently I've noticed the trend of the "Dipped" Basket, where it looks like you have dipped part of the basket in paint, and wanted to give it a try. I was holding out until I found the right basket and was really set on a color and I'm so glad I did!
INSPIRATION - From Martha Stewart
I used my Krylon Copper Brilliance (that I finally found at Michaels and three other stores were out) spray paint and it worked great! Several of the instructions I saw involved pour paint in a bucket and actually dipped your basket in. But that seemed like a huge effort and waste. The spray paint method worked really well.

I turned my basket upside down and used blue painters tape to mark the area I wanted painted. Then I taped on newspaper to cover the area I did not want painted. My basket was very "nubby" so the paint didn't stick very well and I was worried that it would make a clean line. But it turned out just like I wanted! My only regret is that I didn't start higher up on the basket to make it more dramatic. It is subtle and adds just a tiny bit of sparkle to my living room


 Click HERE to see my other projects with Copper Spray Paint


Wednesday, November 5, 2014

Star Wars Bedroom

When it was time for my 9 year old son to get a "bigger boy" room of his own, I immediately knew we should go for a classic Star Wars theme! We had a great collection of the 70s and 80s Star Wars toys we had collected over the years, but he wasn't interested in really playing with them any more.

I'm a huge Star Wars fan myself, and I really enjoy sharing this interest with my boys. I wanted the room to by playful, but not childish. The room was a pale green, and I was not able paint it - so we had to work with that. My son fell in love with this orange comforter one day at Target, so our colors were picked! I was lucky to find the two saucer chairs at the local Good Will and the Chevron Rug at Walmart, which made the room super low budget.

Make Your Own Art
I love the idea of creating your own art and was looking for ways to make that happen in our Star Wars Bedroom. We did that in three different ways: Frame portraits of my son dressed up as Star Wars characters and two different toy displays: the character terrariums and the vehicle strip.

Displayed Toys: 
Character Terrariums
We decided to depict our favorite scenes from the original Star Wars trilogy in terrariums. We started by laying out all our characters to see who we had and what resources we could use. We used different mediums for each terrarium, and completely just used what we had on-hand. Like epsoms salts for the snow on Hoth, sand for Tatooine, lichen for the Dagoba swamp and black painted rocks and glitter for Death Star. I was SO happy to use an old pickle and candle jar for two of the terrariums (that totally justified my jar collection), but we needed a few bigger jars too that I ended up buying at Target. My son helped was completely involved in the creation of the terrariums and it was a great lesson in construction and physics... plus we had a good laugh. 
This idea was inspired by the book World of Geek Craft.
A Rebel boarding ATAT Walker on Hoth -  R2D2 and C3PO lost on Tatooine
"Luke, I am your father..." - Yoda teaches Luke how to use the force
Displayed Toys: 
Vehicle Strip
I had a great collection of Star Wars vehicles and envisioned a way to display them, where he could also pull them off and play. But they are all large toys, so they need to be store up the wall. We cut a 2"x4" to be about 6' long and paint it orange. We picked the coolest looking vehicles from the collect and used screws to hold them in place, but didn't ruin the toy and made it way to remove. The display is a nice use of vertical space in the room, don't you think?

Posters
The funnest part of the project was our "Photo Shoot". My son dressed up in his best (and only) suit and borrowed a variety of Dad's ties. Super cute, right? Well then we topped it off with our collection of Star Wars masks... and the result was awesome-ness! We chose the ties and different knots to go with the character, of course Darth Vader needed a red power tie with a Windsor Knot.

I had them printed at Walgreens, with a kind of Andy Warhol effect, in large poster sizes and used a Retail Me Not coupon to bring the price down to about $14 each. I picked up simple poster frames at Target and Walmart to finish them off.

Purchased Art
We had one more wall to fill and I found these great vintage pop art prints on Etsy for only $40 for all three. They incorporated the orange and green colors for the room and were a nice addition. The dresser is a $20 garage sale redo that I refinished with a neutral grey, that will fit in any room.

I could not be happier with how the room turned out and I hope it will last him for many years.

Get the look: