Thursday, September 15, 2016

Liquor Lights - Easy Outdoor Solar Lights

I love to reuse and recycle lots of things, and I always find a use for glass jars. After throwing a few parties in the last year, I had I gorgeous tequila and other liquor bottles that I saved. Just waiting to find an idea on how to reuse them...

Then as I was replacing/repairing my outdoor solar lights, it occurred to me that I could stick the  plastic solar tops on my pretty jars and bottles.


All sorts of glass bottles will work for this project. At first, I wanted to do only the "fancy" bottles. Then I came to really like just the 2 liter Vodka bottles with a handle.  I like all the different heights and sizes too.

Step 1:
Have a nice collection of bottles ready. Remove labels (I soak in soapy water and then use a knife to scrape the last bits).

Step 2:
Unpackage your solar lights. Take the top off the lights, where the light bulb is. Remove any protective covering over the solar panel, and make sure it is turned on. Put it in the sunlight, solar panel up, while you work.


Step 3: Place the solar tops on the mouth of the bottles.

Step 4: Wait for it to get dark!

Voila! 


Monday, December 14, 2015

Christmas Door Decor - The Old Oaken Bucket


Making use of Primitive 
Garden Artifacts for Christmas Decorations

One of my finds this summer on the west end of Eureka Springs, Arkansas was a great old wooden bucket.  It was painted a lime green and I knew I must invest in it as they are hard to find.  I wasn't sure just how I would use it but knew something would trip my fancy.

Sure enough this Christmas season presented just the right opportunity.  My sister in law in Wilmington North Carolina shipped me a big box of large pine cones that fall to the ground from massive pine trees near her home. I've kept them by the front door in a planter all year long but wasn't happy with their destination.  


The Old Oaken Bucket

I used a leftover bow from last year's decorations, the pine cones and an outdoor all weather battery candle to the old bucket. Below the pine cones I stuffed left over fake greenery as a filler.  I have placed the bucket by our front door decorations.  You will also find those outdoor decorations in another blog here.  

I've also collected many old watering cans over the past two years as garden decorations.  Placing artificial poinsettias in one that has a wash of red paint was a great touch for the back patio.  Its easy to view out the back hearth room glass door.   


Old Watering Can Re-purposed for Christmas


Just a View Out The Hearth Room Door

Saturday, December 5, 2015

How to Glitter a Champagne Bottle


A year ago I stumbled on a blog that had a photo of a glitter champagne bottle while trying to come up with ideas for a New Year's Eve party. Ever since I have been hooked! My friends raved about the bottle and I decided for the next year I would gift glittered champagne bottle to anyone who invited me to their birthday party! The reception has been great, and I have made about a dozen of these now. They are really easy to do, but they take a little time.

Supplies:


Step 1: Use painter's (blue) tape to cover anything on your bottle you don't want glittered. I have the top foil and most of the label glitter free. But you can glitter over the label if you want! I choose Piper Sonoma champagne mostly because it has a gold foil topper and it looks nice with gold glitter.

Step 2: Spray paint your bottle with gold paint. Just a quick light coat is good enough. If you skip this step, the final product just doesn't look as polished and you can see some of the dark bottle through the glitter.  Let it dry.

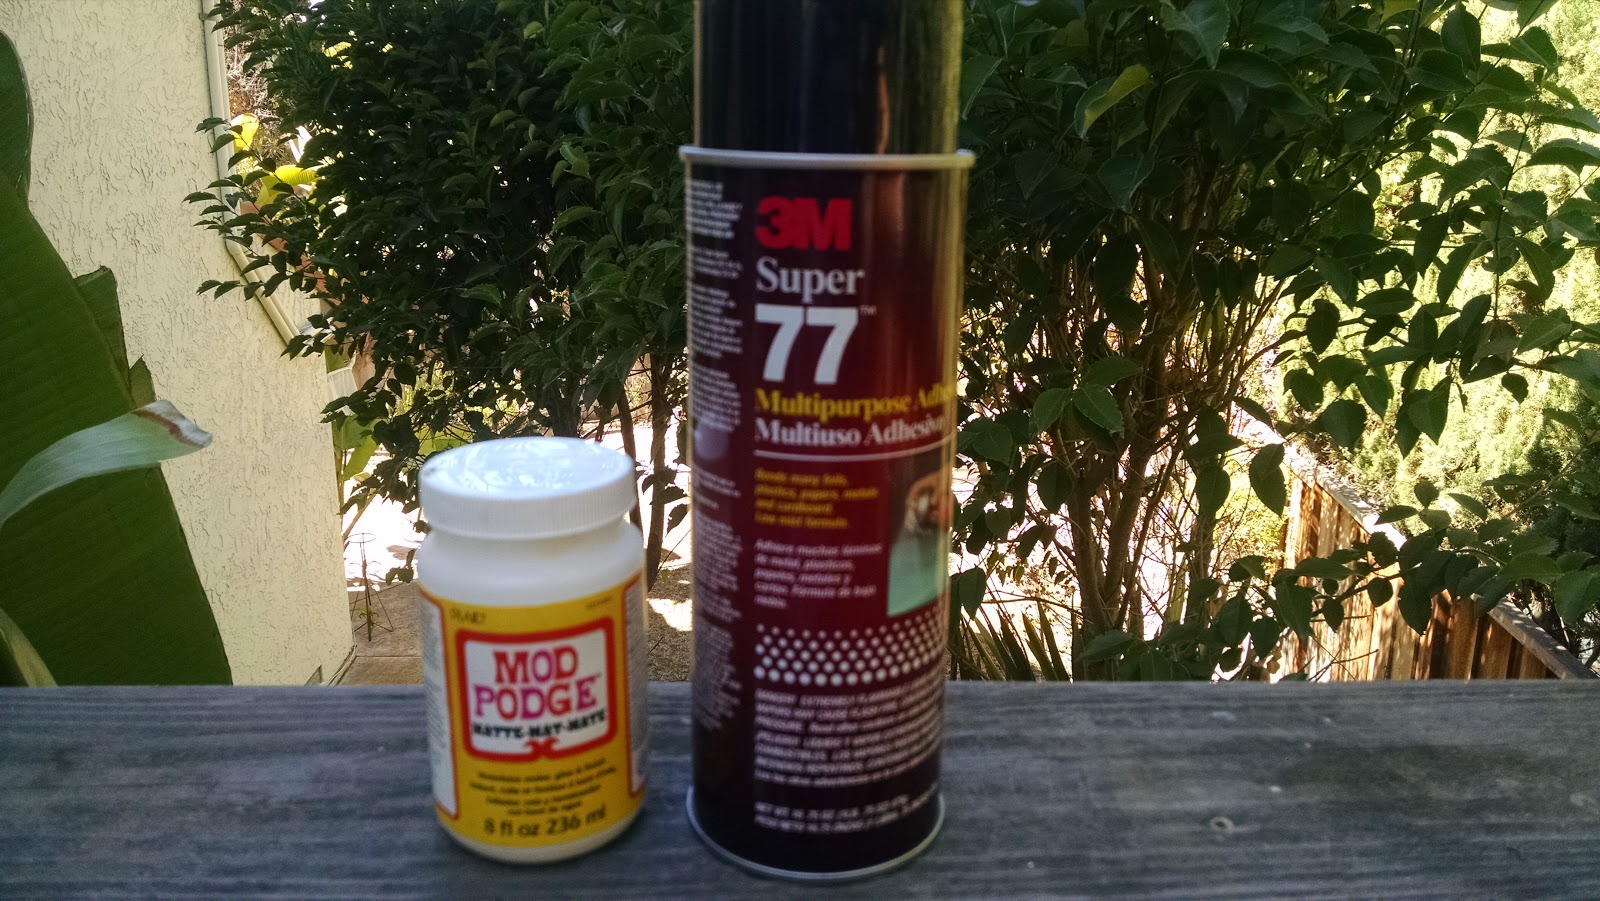
 Step 3: Choose your glue method - Modge Podge/glue or a spray adhesive. I've used both methods and typically stick with modge podge. If you use the spray adhesive, you must be quick as it will dry fast. Cover the bottle with your glue. When using Modge Podge/glue I apply it with a brush.

Step 4: Immediately, while the glue is still wet, sprinkle with glitter. I hold the bottle over a box or plate to collect to excess glitter - there will be a lot. I can reuse the excess glitter. I sprinkle over several times to cover the entire bottle really well.

Step 5: The bottle will feel rough after this and glitter will flake off, even when the glue dries. Let it get somewhat dry. Next, we seal it!

Step 6: To seal on the glitter, cover the bottle with another thick layer of Modge Podge/glue. It goes on white and looks like this - but it will dry clear. When it dries, the glitter will not flake off and makes the bottles much more usable. If you skip this step, glitter will get everywhere you bottle goes.

Finished Product! Glitter Champagne ready for gifting
Step 7: Peel off the painter's (blue) tape and let the bottle completely dry. They should feel smooth, no longer rough and the glitter should not flake off. They are ready for service and gifting! 

To learn how to make the Glitter Initial Tag hanging from the bottle on the right, CLICK HERE.

Monday, November 30, 2015

New Years Eve Party Decorations

Nothing is funner than gathering your friends together to ring in the new year! Here my ideas for a New Year's Eve Gathering!

Serve a potluck - spending all your time cooking will spoil the fun, plus it gives your friends an opportunity to shine!
Make a signature cocktail, with a fun themed name - I made Amber's French Kiss
Make your place sparkle - I glittered a bottle of champagne, and put up string lights. I also added a few large bottles with Christmas lights shoved inside to bookshelves and cabinets. I used shiney gold gift wrapping paper to decorate table tops and the bar too.
Play great music - I used Google Play Music's radio NYE station and had great music I didn't have to worry about!

Midnight Kisses and Noise Makers

I used random crystal bowls and tin buckets to display snacks and food. I found small chalkboard signs attached to paper clips at Micheal's and used them on the bowls.
Drink of the Night: French Kiss
I always *LOVE* a themed drink for a party! With a little research I settled on a French Kiss with a little twist. I used pretty photo frames with black construction paper make chalk boards at the bar, with the name of our special drink.

Amber’s French Kiss Cocktail
1 ½ oz Vodka
1 ½ Pineapple juice
¼ oz Chambord
¼ oz Triple Sec
¼ oz Half and Half

Shake with ice and serve

Glittered Champs

Homemade Confetti
 The kids dumped homemade confetti on us from the balcony at midnight. We used hole punches to make it.
Drunk Gummies
 I made Drunk Gummies for the adults. It is basically gummie bears soaked in vodka in the refrigerator for several days. The trick is to buy the good brand of gummy bears, and let them soak in a glass dish for about 5 days. Any less and they taste awful. I s
Girlfriends having fun!
Me, the bartender!
I decorated the bar with gold and white chevron wrapping paper, and small jeweled blinking lights scattered around the wine and champagne glasses. I made the large BAR light up sign for another party and decided to put it to use in my bar! It is basically made of red construction paper, target lights with a foam board backing (Instructions I used HERE)

Supplies:

Saturday, November 21, 2015

Hunger Games Mockingjay Birthday Party

My son loved the Hunger Games book series. By coincidence, his birthday has fallen on the premiere of the movies, so we have held a few Hunger Games themed parties! This year we started with a fun invitation to get the kids in the mood. We started the party with a series of Minute to Win it games and then headed off for the theater. Afterwards we had pizza and the kids watched the older Hunger Games movies. We topped it off with a District 13 Cake, since he was turning 13 and the Mockingjay Part 1 was all about District 13.

For a party favor we made these really fun shirts. We used a "reserve technique". Instead of applying a iron on or stencil, we used bleach to remove color from the shirts. I used freezer paper that I cut out with an exacto knife to make a stencil. Then hung the shirts in the shower and used a spray bottle to apply the bleach. The custom Mockingjay shirts turned out beautifully!

Shirts all ready for the party guests
District 13 Cake - made with powder sugar stencil
Party favors, cake and glow lights ready to go!
Minute to Win it scoreboard
The boys at the theater with their Mockingjay shirts
Hunger Games invite
Click here and use FILE: MAKE A COPY in Google Docs to use my Hunger Games Invitation.


Click here to FILE: MAKE A COPY of my District 13 cutout I used to make the shirts

Tuesday, November 17, 2015

Lego Mini Figure Storage and Display

My oldest son was a HUGE Lego fan for about ten years and he amassed quite a collection during that time. If your child is into Legos, then you know they create a big mess. So I was always looking for ways to organize the Legos, that also allowed my son to continue to play with them. I wasn't very successful actually! As he got older my focus was to display these beautiful toys in a more mature way.

I finally repurposed this small display shelf to hold their most important minifigs. I used green postboard to cover the back. That served to help see the minfigs better, since they would show better than with a white background. Also the display shelf had star & moon cutouts I wanted to hide. Next I glued down a large Lego plate that I cut to fit each shelf. The height was too high, so I added a half shelves also made with the Lego plate. Then I added in all the Lego Mini Figures that we have collected through the years. It makes a lovely display on my son's wall.


Half way done - before I added more shelves

Star Wars Minifigs

Pirates of the Caribbean - More favorite minifigs

Lego Toy Story Minifigs - old favorites

Lego collectible minifigures
Lego Minifig Shelf


Saturday, September 5, 2015

Repurposed Jars - Glitter Lantern


I save pretty much all my glass jars, just in case a fun project comes up. Jam and jelly jars, peanut butter and pickle jars, olive and coconut oil jars! Each one is unique and will be great for some future repurposing project.

I hosted a large party where we decided to make small lanterns as the guest's party favor. It was a bonus that we could used the lanterns to decorate during the party, then they would help light the guests on their way home.

The best part of this project is that over a year later, I still see friends using this party favor in their homes or patios!

We used all different kinds of jars: pickle (bigger and squat), jam (wide mouthed and smaller), olives (taller with a wide mouth) and lots of pasta sauce jars. All the different shapes and sizes were fun to see!

Super Simple How To:
1. Soak the jars in soapy water to remove any glued labels, or use a knife to scrape off any remaining stickiness.

2. Once cleaned, I painted the insides of each jar with a mixture of watered down glue (or modge podge)and silver glitter. The glue will dry clear, so only the glitter is left behind. 

3. I then used crafting wire to wrap around the mouth and make a simple handle.

4. Add some fine sand to the bottom. Depending on the amount of glitter you may not be able to see much of what is inside the lantern.

5. Insert a battery tea lights, and watch it twinkle!